This tutorial is for binding a quilt with straight edges using binding strips cut on the straight grain from your own fabric (not purchased binding).
First of all you need to cut your binding strips. I used strips that were 1 7/8" wide but if it's your first time you should probably use 2 1/4" or 2 1/2" strips. You'll have to figure out how many strips you need to go all the way around your quilt with several inches to spare. You can use math, or cut the strips and physically lay them around the edge of the quilt until you have enough. I've done scrappy quilt bindings before using several different fabrics, and used the physically-laying-it-out method for those quilts.
Using the angle lines on your ruler or mat, cut the ends of the strips to a 45 degree angle.
Cut both ends the same way so the strips are very long parallelograms.
To get them ready to piece together, set two strips next to each other.
Then, flip one over on top of the other so the edges line up for sewing. You will sew a 1/4" seam, so they need to line up 1/4" in from the edge. Pin it.
Sew it. Sew all the strips together this way. The diagonal seam here helps spread out the bulk of the seam, since you'll be folding the binding strip over itself a couple times.
Go to the ironing board; press the binding seams. I press to one side, you can press them open if you want but that's more work.
Now press the entire binding strip in half the long way.
Next, find the end of your binding strip. If your parallelogram went the opposite way from mine, cut the corner off so it points the way mine does in this picture. Press the short edge in 1/4".
Fold it in half lengthwise and press this end again.
You can't really see it in this picture, but I'm leaving it anyway. Lay out the binding around the quilt, with the end you just fiddled with in the middle of one of the sides. Check the seams on the binding to make sure there aren't any of them on the corners of the quilt. If there are, adjust your starting position. Pin the binding in place at the starting position and go to your machine.
For the entire perimeter of the quilt, you need to match up the binding and quilt edge and sew 1/4" in from that edge. I leave the extra backing and batting until after the binding is sewn on. To begin, you will be making a little slot to put the end of the binding in when you get back to your starting place. Open up the fold of the binding and sew down just the bottom layer for about 2 inches. Stop sewing and cut your threads.
Edited 9/2012: *For another way of finishing up the beginning and end of your binding strips (with a diagonal seam) see this blog post.*
Now fold the binding back up and start sewing both layers of the binding down, about 1 3/4 inches down from the beginning.
Sew the binding down that first side. I found that it helped if I pulled the binding a bit taut while sewing. When you get to the corner, stop sewing 1/4" from the edge of the quilt top. Backstitch and cut your threads.
Now, turn the quilt 90 degrees, and fold the binding straight up. Hold that diagonal fold with your finger.
And now, fold it down. You might want to pin.
Start sewing the next side at the edge of the fabric; stop 1/4" from the edge and do the corner thing again. Repeat until you've done all 4 corners.
When you get back around to where you started, you need to trim the end of your binding strip so it will fit in the little pocket you made at the beginning. I trimmed the end of my binding strip so about 1/2" of it went into the slot area past the angled part of the beginning of the binding. You have to look closely to see it in this photo.
Now you get to trim the quilt. For the 1 7/8" binding, I needed to cut the backing and batting right up to the edge of my binding. For wider binding strips, leave a little bit of batting beyond the edge. I have had a couple quilts in quilt shows and one of my judging sheets once explained that it's better (in official quilt world, I guess) to have the binding kind of puffy and nicely filled out than to let it be saggy, limp, and empty. In other words, I got bad marks for not having puffy binding, so learn from my mistakes.
I hand sew the binding to the back of the quilt. I use a ladder stitch, it's my main hand sewing stitch that my mom taught me when I was little. You can use whatever stitch you like. I try to sew the binding down far enough to cover the machine stitching that sewed it to the front of the quilt.
When you get to the corner, trim the seam allowance a bit more than you did on the straight edge.
(I'm left handed. If you aren't, this picture may not look quite right. I sew from the left to the right.) I try to fold the binding down on the top side of the corner, and sew it down past where the seam turns the corner.
Then, I fold the next side down and stitch it in place. I usually put a couple stitches in the binding where it folds on top of itself (the mitered corner), and then continue sewing down the next side of the binding.
All done! I hope this make sense. As always, comment or email me at vickivictoria at the google email service if you have questions or comments!
Monday, September 24, 2007
Sunday, September 23, 2007
projects update...
I did sew every day last week. I'm almost finished with the quilt binding and the photos for the tutorial. I knitted 2.5 dishcloths and made a sling. I had a bit of a fiasco with a shirt... it's kind of a bummer. I got this great shirt from goodwill to repurpose, and I downloaded and printed and cut out and taped together pattern for the Emily shirt from burdastyle. Anyway I hurried and cut out the shirt and sewed up one sleeve and... it's too small and the darts are weird. I can probably, sort of, salvage it, but there's going to be a lot of unpicking and I should really undo and redo the side darts. I was so clever too; I cut it so I'm using the original buttons and buttonholes from the shirt. See, it was going to save me time. I am planning/hoping on using the cuffs and collar from the shirt too but they probably will need to be altered a bit to fit.
So I need to let out the side/sleeve seam, I need to undo it so I can fix the dart first. I was really hoping this pattern would work and be easy. Oh well, I'm going to keep working on it and see if I can rescue it.
I need to get 3 quilts ready to tie for the church service activity, that's my absolute must-do this week. I am also getting Christmas ornaments ready to make (hand sewing) while I'm on my trip.
Wednesday, September 19, 2007
today's sewing
I sewed up 2 cloth grocery bags that I already had cut out. I got the sling fabric (for my SIL) all ready to sew. I'll post pics tomorrow.
Tuesday, September 18, 2007
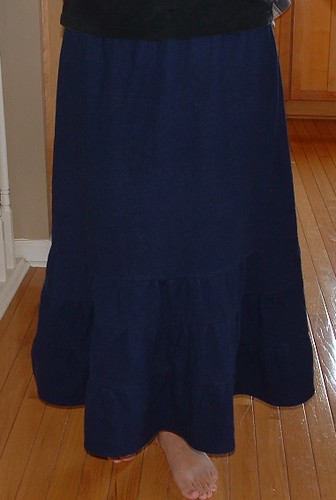
Finished skirt
I finished this up around noon today. I used 1/2" elastic in the waist and I think I need to tighten it up a bit. I really like the drape and feel of the linen fabric. I'm a little bit excited about finishing something in only two days as well. I think I will need to make a couple more like this... it could be really cute in baby cord for fall, don't you think?
Monday, September 17, 2007
I'm sewing every day this week
Here's the skirt I'm making for myself. I think it's going to be cute. I sewed this much today (it was already cut out) and I'm still going to pin and adjust the gathers on that last seam there. I'm still not sure whether I'll add a drawstring and elastic for the waistband or just use elastic. Oh, and I forgot pockets. Oh well.
I finished these dishcloths yesterday. The red one is messed up but I decided to show it anyway. I like the pattern of the yellow and green one and have started another one, this time with a green and blue variegated yarn.
I also went running tonight and went to the library with the kids today.
Saturday, September 15, 2007
Smart Habit Saturday
Oh, I really need this. My new habit for this week's Smart Habit Saturday is... kind words.
I need to work on this in many aspects of my life. I did pretty well today, except for a shameful outburst tonight.
My past habits are dealing with all the dirty laundry daily, and dishes done before bed each night. I'm doing pretty well on those.
I need to work on this in many aspects of my life. I did pretty well today, except for a shameful outburst tonight.
My past habits are dealing with all the dirty laundry daily, and dishes done before bed each night. I'm doing pretty well on those.
I'm a left handed knitter.
I'm not a really prolific knitter, and all I really make is dishcloths and, occasionally, socks. A friend of mine was knitting up a dishcloth using this pattern and I had her email me the link for the pattern. She recommended that I use a knitted cast on, and since I only knew one cast on method, I googled it and in my search, kept finding statements something like this: Since knitting is an activity that uses both hands, we recommend that left-handers learn to knit right handed. I've also been told this exact thing by a yarn shop owner/teacher. Not exactly helpful. In knitting, one hand does most of the work, and for me, that really needs to be my left hand.
From what I read on Knitty, some left handed people are ok learning to knit righty, but for some it is just not possible. Here's how knitting works for me: I hold the working needle in my left hand, and knit stitches from the left to the right. Finished stitches are on the left needle.
This doesn't cause problems for me while reading patterns; if I ever knit a sweater with two different fronts I might end up with a left front after knitting the right front instructions. But then I would end up with a right front from the left front instructions. And, with cables, I have to twist them the opposite way in order to get correct results. But knitting left handed isn't really a problem, at least with the simple projects I make. I follow patterns as they are written and things generally come out looking the same as if a right handed person made them.
I did get really frustrated at not being able to find left handed instructions for the knitted cast-on. I'm sure I need to dig a little deeper and maybe it's out there. At any rate, it wasn't that difficult to read the directions I found and transpose them to using the left hand for the working needle. Here's how I did it: make a slip knot, place on right needle. Insert left needle into the yarn as if it's a knit stitch, pull up a loop. Place this loop on the right needle. Repeat until you have the desired number of stitches.
I'm going to keep looking for good left handed casting on and other knitting instructions and if I don't find them I just might make my own photo tutorials for the ones I know so far.
Monday, September 10, 2007
Free Motion Machine Quilting Tutorial
Machine quilting takes practice, but it's much faster than hand quilting and I love the look when it's finished. It's probably a good idea to make some 12 inch "quilt sandwich" squares of batting in between two layers of muslin and practice quilting those first. And also, know that it takes time and practice to develop this skill. Your quilting will improve with each quilt.
So... here we go!
There are several things you need to do to get your machine ready to machine quilt. You need a darning or free motion quilting foot. The special thing about this foot is that it goes up and down with the needle while you are sewing. This makes it so you can move the quilt any way you want while you are quilting it.
Lower the feed dogs on your machine. I have read that if your feed dogs don't go down, you can tape an index card over them. I haven't tried that though. You don't want the feed dogs telling your fabric which way to go; you are going to be moving it with your hands.
If your machine has adjustable presser foot pressure, you probably need to adjust it so there is space under the presser foot when the lever for the foot is in the down position. You have to have the presser foot in the down position in order to have top thread tension; if you don't have top thread tension, you can't sew. This picture shows the little black dial to adjust the presser foot pressure on my old Viking machine.
Your machine may not have adjustable presser foot pressure; one of my sewing machines does not. I can still machine quilt with that machine because it has a quilting foot that goes up and down with the needle while I sew.
I'm sure there are other types of machines and setups for machine quilting, but I only have experience quilting with two types of sewing machines. Whatever you need to do to get ready to machine quilt, you need to have your presser foot go up and down with the needle when you sew.
And finally, don't forget to change to a new needle. They actually make machine quilting needles, which I have used, but I haven't noticed a difference between those and regular universal needles.
Get some machine quilting gloves or other gripping device. I got my gloves at a local quilt shop, and I like them. They have plasticky gripper dots on the fingers and palms and make it much easier to move the fabric around while I'm quilting. There are also other options for helping you get some grip on your palms and fingers and you can find them if you do a search for quilting notions or quilting gloves.
If your sewing machine has a table extension thing, use it. If your machine fits into a cabinet and you have a flat surface, that's even better.
Next you need to get your quilt ready to fit on the machine. This is a baby quilt that's about 36"x42". It's not that difficult to quilt, but bigger quilts require more wrangling and patience. For a baby quilt, I quilt half of it, lengthwise, at a time. First, roll one side in to the halfway point; this side will be to the left of my needle.
Then, roll the other side in a little bit, leaving 5-6" or so unrolled in the middle.
(With larger quilts, you will probably do 3 or 4 or more sections of quilting, adjusting how the quilt is rolled up each time.)
Next, take the quilt and accordion-fold it from the bottom. The folded part will be placed in your lap and you will start quilting at the top.
First, position the quilt, lower the presser foot, and then using the hand wheel (is that what it's called?) take one stitch and pull the bobbin thread to the top.
Make sure the needle is right above where the bobbin thread comes up, and sew 3-4 stitches in one place. This anchors the threads and then, ta da! You are ready to quilt. You will need to pull the bobbin thread up like this each time you start stitching.
My son, who is 7, took this picture. It is supposed to show my hand position when I'm starting quilting. It's not the best angle to actually show that, sorry.
I quilted over to the right side of the quilt, unrolling it a bit as I went.
When I went back to the left, I had to roll up the right side of the quilt again.
I ran out of bobbin thread so I decided to take a picture and show you how it looks so far. You might want to make sure you have a full bobbin, or two or three, before you start. When you stop quilting (on purpose that is, not when you run out of bobbin in the middle) you need to sew 3-4 stitches very close together to keep your quilting line from coming undone. When my bobbin runs out, I just start sewing about 1/2" before the spot where my bobbin ran out, and sew right on top of those last few stitches.
Here's the back.
In this picture, I'm getting close to the bottom of the quilt. I find it helps control the motion of the quilt if I fold the top of the quilt under as I get closer to the bottom.
This is the quilt with the first half of the quilting finished.
This is the back of the quilt, showing a little closer up view of the unquilted and quilted areas. After you finish quilting the first side of the quilt, you will need to lay it out again, and roll up the already quilted side so you can quilt the other side. Try to make the second section of quilting blend in with the first section.
This shows the quilting all finished.
Here is a closer view of the quilting from the back. And, a little discussion about the meandering style of quilting that I used on this quilt. Meandering is a kind of curvy quilting that typically has smooth curves, no sharp (or blunt, I guess) corners, and lines that don't cross over each other. If you look closely at this quilt you might see some loops in my quilting; I got stuck and had no other choice. Plus, there are no quilting police. Also in meandering, you should try to keep the distances between quilting lines relatively even.
When you are practicing, I'd suggest trying meandering, in different sizes (when it's smaller it's called stippling). You could also try writing your name, drawing pictures, making loops, or whatever you want. You just want to get used to the feel of moving the quilt with your hands while you're pushing the pedal with your foot. Which brings me to stitch length: there are long arm machines and Berninas with stitch regulators that help keep your quilting stitches a uniform length. If you're just quilting on a regular machine, you'll need to be your own regulator. You don't want to have stitches that are overly long or too short. You'll need to experiment to see what stitch length works for you. You might want to try going faster (via the foot pedal) than you think is necessary and then figure out the right speed to move the fabric with your hands.
Let me know if you have any questions or if you have some quilting you want to show off!
EDITED to add:
When I machine quilt, I start in the middle section and usually go left to right in a section about 8-10 inches wide, and then go back and forth while I'm moving down the quilt. Then when I get to the bottom, I clip threads, re-roll the quilt, and start again on one of the sides (or slightly over from the middle, if it's bigger than a baby quilt).
Saturday, September 08, 2007
Smart Habit Saturday
Wow, I made it through my first week with a Smart Habit Saturday goal. My goal was to take the dirty laundry down to the laundry room every day. I did pretty well with the exception of leaving it (all gathered up though) in a basket in the kitchen-level hall on Friday. I found that it wasn't all that difficult of a task, and I'm going to keep it up and add, for my new goal... ugh. Making sure all the dishes are done each night before going to bed. I have a bit of a hard time with being told what to do, and if you've ever checked out Flylady, you know that cleaning your darn sink is her first assignment. I've done Flylady reasonably well... a couple times, over the years, but not the "clean sink" part. I'm finally ready to go there. We'll see how it goes.
Wednesday, September 05, 2007
Quilt Basting Tutorial, with bonus batting piecing instructions
Here are instructions for how to baste a quilt in preparation for machine quilting. You could baste it like this for hand quilting or tying as well.
Here's what you need:
quilt top
batting
backing fabric
wide tape
curved safety pins
Kwik Klip pin closing tool
I didn't have a piece of batting the right size for this quilt so you also get to see how to piece together batting.
Step 1: Spread and smooth out your backing fabric on a carpeted floor. The backing should be about 4-5 inches wider and longer than the quilt top. I used flannel for this quilt backing, but sometimes I use regular woven fabrics too. If there is a right side of the backing fabric, it needs to face the floor. You can iron it too, but it's not necessary unless your fabric is super wrinkly. Use wide tape to tape it down. You don't want the backing fabric to be stretched tight, just flat and smooth. I usually use packing tape but haven't been able to find it, so I used duct tape this time.
Step 2: Spread your batting out on top of your backing fabric. I had to use 2 small pieces; I overlapped them by about 4 inches.
Step 3: Cut on an imaginary wavy line through both thicknesses of batting.
Step 4: Remove the small cut pieces of batting and match up the curved edges of the batting pieces. They should butt up to each other but not overlap.
Step 5: Next you'll hand sew the batting pieces together. Here you can see how I did it because I used black thread. You should use thread that matches the batting though. It's ok to use pretty big stitches. The quilting will hold this together fine in the end.
This photo shows the batting seamed together. I removed the black stitches and sewed the entire seam with light colored thread.
Step 6: Spread the quilt top on top of the batting. Iron it first if it's really wrinkled. Smooth it out nice and flat.
Step 7: Using curved safety pins (these should be available at your local quilt shop), start in the middle of the quilt and pin all 3 layers together. I put pins about every 4-5 inches. Make sure you don't pin the quilt to the carpet. I use the Kwik Klip pin basting tool for closing my pins. You can use your fingers but they can get pretty sore after closing lots and lots of pins.
Step 8: Cut off the excess batting and backing, making sure to leave a couple inches beyond the edge of the quilt top. Then, remove the tape (give it to your kids so they can make a tape ball) and you're ready to quilt. Unless you pinned your quilt to the carpet. In that case, just fix the places where you did that and then you'll be done.
I hope this is helpful! As always, let me know if there are any questions or clarifications needed.
Subscribe to:
Posts (Atom)