I have no idea how often I'll do mini-quilt Monday, but here is my second one:
Photo taken at night, the color is sadly off a bit in this picture.
Circles were appliqued and quilted in one step, by hand, with embroidery floss. All the quilting was done by hand.
Pieced back.
I haven't named a lot of my quilts but I decided this one was to be called "Summer Breeze" because it's made mostly of vintage bed linens. And maybe several of them spent some time on the clothesline a long time ago.
This was given to TDK Katie for the sewingmamas.com summer 2009 doll quilt swap. I haven't swapped there for ages but this was a good one and I'm glad I joined in.
Monday, July 27, 2009
Sunday, July 26, 2009
a few things I made
These are from Weekend Sewing by Heather Ross. Made from a cute sheet I got at goodwill a while back. The pants are so, so comfy. The bloomers need leg elastic, I found a good deal on a 144 yard roll (that ought to be enough), so as soon as that comes, they'll finish up quick.
A few 9-patches. I'm not exactly following AmandaJean's quiltalong, but eventually will make something inspired by this. I made 6 more of these after taking this picture.
This is baby L and the quilt I received from Katie for the sewingmamas.com doll quilt swap. I really like all that pink and green. And the strips and straight line quilting. And that dotty binding.
:) I have a busy week ahead but hope to post about a few other things I've finished in the next couple days. I have another quilt block tutorial photographed, too.
Thursday, July 23, 2009
quiltalong Block B instructions
All right, here we go with block B. This block is comprised of 3 concentric squares. I used three fabrics in this sample block, and I'm calling them "inner, middle, and outer" here. You could make this block with two fabrics if you want--one for both inner and outer squares and a contrasting fabric for the middle square. Maybe I'll try that on another block soon.
Let's get started!
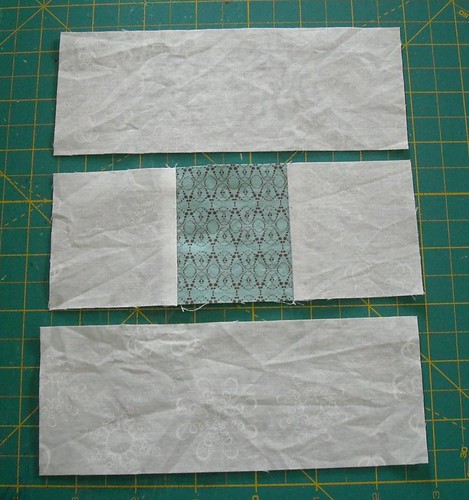
Step 1: Cut a 2.5" square from your inner fabric. Cut two 2.5" squares from your middle fabric.
Step 2: Sew the middle squares to two sides of the inner square. Press.
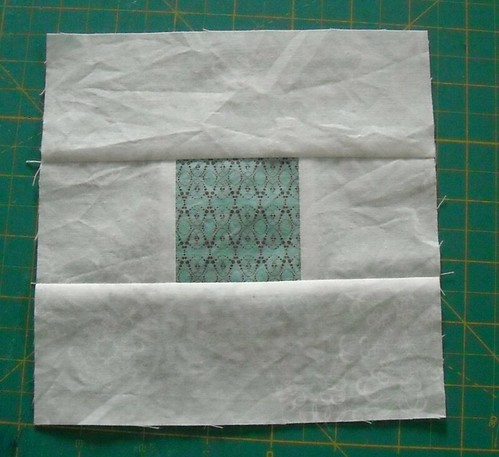
Step 3: Cut two 2.5"x6.5" strips from your middle fabric.
Step 4: Sew these strips to the top and bottom of the block. Press.
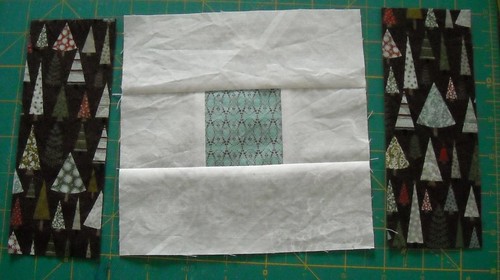
Step 5: From the outer fabric, cut two strips 2.5"x6.5". I used fabric with a directional print again so I had to pay attention to which way I cut my strips here.
Step 6: Sew the 6.5" strips to the sides of the block. Press.
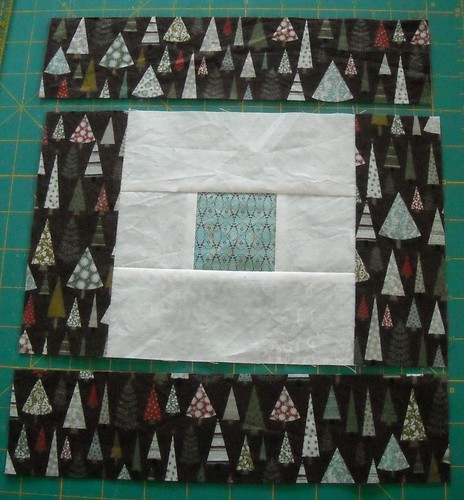
Step 7: From the outer fabric, cut two strips 2.5"x10.5". I cut these strips so the directional print is going the same way as the side strips.
Step 8: Sew the 10.5" strips to the top and bottom of the block. Press.
You're done!
p.s. If you're wondering, I still don't have the right name for this quilt pattern. I'm thinking about it and it will come to me eventually!
Saturday, July 18, 2009
new fabric
We went on a little day trip to Lawrence today and I got to go to Sarah's Fabrics. I had fun looking and admiring all the beautiful fabrics. Here's what I got:
I have admired the Neptune fabrics for a long time so I was glad to get them, and the bugs are by the same designer, Tula Pink. I am working on a bit of pink and aqua and red stash I guess.
This past week the boys had swimming lessons and somehow that seemed to take a big chunk of my time. I worked on a swap quilt for the SewingMamas.com doll quilt swap... It is all hand quilted and I really like it. It is -this- close to done and I'll post a picture of it after the recipient gets it.
I went through my sewing stuff (in one location, there is more in my bedroom closet) and folded and packed it away more neatly. I made a list of started projects and projects I hope to start soon. I need to start making a dent on that UFO list.
Oh I also took my Viking in to the shop yesterday. It is my only machine with a walking foot so when I get it back I will be able to finish something I started quite a while ago.
Thursday, July 09, 2009
quiltalong block A
I'm finally ready to move along with something I started way last year, my quilt-along for this quilt:
Jan at Creative Instigation is hosting a brainstorming session for the name of this quilt here. I like the ideas so far, and have another possibility I came up with myself, but I'm still open for suggestions if you have them.
So. Here is my original quilt-along post that includes yardage requirements for making the quilt as pictured.
And here are the directions for block A, which finishes at 10" square (it will be 10.5" before you sew it into the quilt):
Step 1: Choose two fabrics. For the center, cut a 6.5" square. For the first two sides, cut strips 2.5" x 6.5". (Don't you love these fabrics? This is the fabulous Figgy Pudding line designed by Basic Grey for Moda. I'm so happy to finally have this fabric in my grubby little paws.)
Step 2: Sew the strips to the center piece using 1/4" seam allowances. Press seams.
Step 3: Cut two more strips, for the top and bottom of the block, that are 10.5"x2.5 I used a fabric with a directional print (is that a word?) so I needed to cut these strips the opposite way from the side strips.
Step 4: Sew the strips to the block top and bottom using 1/4" seam allowances. Press seams.
Done! Let me know if you make any of these blocks, I'd love to see them!
In the next couple days I will post the block B tutorial. And I'm thinking about adding a couple more block designs to this pattern, too. And maybe a flickr group, and I'm having some thoughts about open source quilting.... Stay tuned....
Tuesday, July 07, 2009
My First Quilt
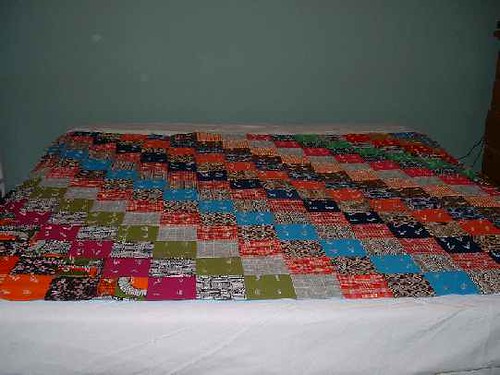
Camille and Carrie are hosting a Parade of Quilts! Here is my first quilt:
Sorry, it's not the best picture, but hopefully you can get a sense of the wonderful polyester double knit goodness that is this quilt. My grandma helped me make this quilt when I was 13. Now, this wasn't what I had in mind when she asked me if I'd like to make a quilt with her. I don't know exactly what I had in mind, but it wasn't double knit polyester. And I have to confess my heart sank a little when Grandma brought out the neat stacks of already cut poly squares. But I went ahead with it, and it turned out ok. The main skills I learned from Grandma while making this quilt were chain piecing, and how to piece batting, when we made this quilt. We put it up on quilt frames in her living room and she helped me tie it. (When I was growing up that's how I thought all quilts were finished--tied with acrylic yarn.)
After it was off the frames, I wasn't in love with the quilt, and I just put it away with unfinished edges, for a long time. My grandma passed away about 5 years after we made this quilt, and soon after her death I got the quilt out and finished up the edges by just folding them in and zigzagging close to the edge. I like the quilt a lot, because of the memories of my sweet Grandma that it holds. I call it my "ugly quilt" and I tell everyone about it, and about my grandma. I still use it on my bed every winter.
And... here is my most recent quilt:
My kids' handprints for my mom, for mother's day.
Saturday, July 04, 2009
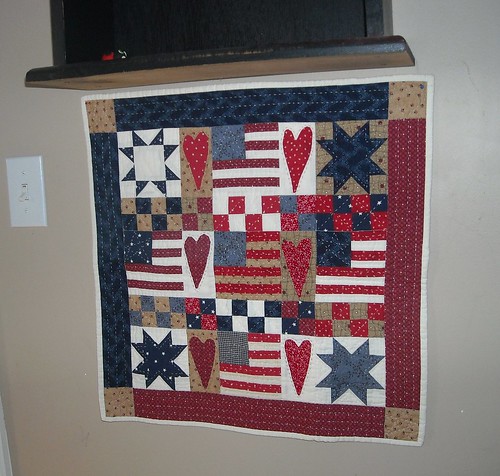
Happy Independence Day!
I made this quilt in 2001. It's hand quilted, and one of my first improvised quilts. I remember really enjoying making it. Not exactly the colors I would choose this year, but it's still cute. It would be fun to remake it in brighter colors and with wonky stars.
I spent the morning sewing and going up and down the stairs to work on the laundry backlog. Baby's quilt top is done. I'd like to start on piecing the back but will feel better if I spend some time cleaning the kitchen. I'm thinking about using the peach-y baby corduroy for most of the quilt backing. I ordered 2 yards from fabric.com a while back, thinking it was a baby pink color, but it turned out to be a bit orange, which means it works well with these Mendocino fabrics.
Friday, July 03, 2009
Mendocino Quilt
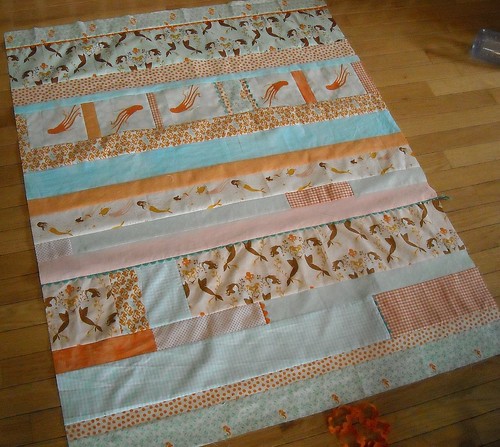
This is what I'm working on today. Baby quilt for sweet Miss L., made from Mendocino fabrics by Heather Ross. I'm taking a lot of time to think about it. Maybe too much? I don't know. Some of the oranges don't go together so well but hopefully I can pull it off and make it look good in the end.
Also, here is the picture of her dress I promised:
Fun, huh?
I just saw some cute 4th of July quilts on Freda's Hive and it reminded me of an old patriotic mini-quilt I made long ago. I think I'll go get it out so I can take a picture for tomorrow.
Hope everyone is having a good weekend!
Subscribe to:
Posts (Atom)