I was really happy to be asked to participate in this blog tour, but when the template and other materials arrived, I found that the smallest size on the template was still much too big for my Kindle Fire. So I knew I was going to re-size the pattern to fit, but I was a little worried about getting it right.
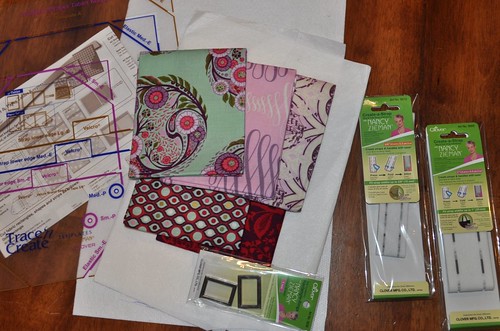
First, I decided to use some of the fabrics from my Parisville fat quarter set. Here's the initial fabric (and interfacing) pull along with the template & instructions, rectangle rings, strap interfacing, and tablet keeper "shapers" which are hard plastic inserts for making the tablet keeper really sturdy.
Next I stewed about making the measurements right for a few days, then re-read the instructions and realized the fabric measurements were pretty much the finished product measurements because the inner and outer layers are sewn together wrong sides together and then it is bound. I came up with the following measurements for the inner and outer fabric layers, along with the two interfacing layers:
8 1/4" tall
11 1/2" wide (or 5 3/4" from the fold--this will make sense if you have the instruction sheet)
I actually made a mistake and cut everything 8" tall and it worked out ok but I think it would be better with that added 1/4".
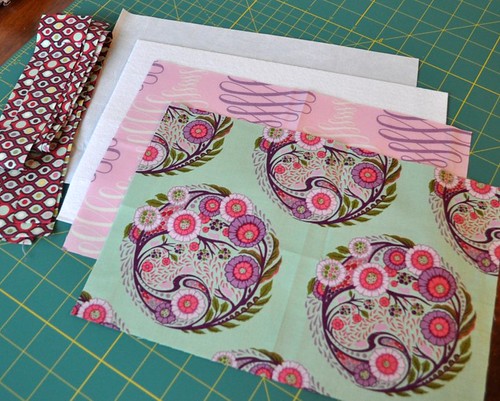
Here's everything all cut out:
(Except I switched to a lighter fusible interfacing and didn't use the heavier interfacing shown here. The very top interfacing in the photo.)
Also, two long strips cut from a fat quarter is *not* enough to bind the whole thing. Cut three strips across the long side of a FQ for your binding.
Also, two long strips cut from a fat quarter is *not* enough to bind the whole thing. Cut three strips across the long side of a FQ for your binding.
After getting everything cut out, I just followed the included instruction sheet and looked at Nancy's blog too for some visual help on making my tablet keeper. A couple other changes I made were the strap length and placement. I made my strap 21", aka the long side of a fat quarter. I should have made it about 1.5" longer. So, my recommended strap length for a Kindle Fire-sized Tablet Keeper is 22.5". Then the velcro placement line needs to be at 5 1/2" and the fold line needs to be at 6 1/2" from the end of the strap. Again, these measurements will make sense if you have the pattern sheet. For the strap placement, I just eyeballed the middle of the cover and put it where I thought it looked good with the print of the fabric.
Some more notes about making my Tablet Keeper:
*I used my walking foot to attach the firm interfacing (I think it's Peltex, not sure because I've had it for a long time.)
*The strap interfacing is really cool. You fuse it to your strap fabric and it has perforations that make it easy to fold in the sides perfectly. I am totally going to use this stuff next time I make a new bag.
*It would be really easy to add a pocket to the interior left side. I think if you do that you should make sure that whatever you put in it will be covered up completely by the pocket to avoid any scratching of your Kindle or whatever kind of electronic tablet you use.
*Elastic. I used a cut up hair band with non-slip grip stuff on one side, as recommended in the instructions. I am really happy with how securely it holds my Kindle in place. It was kind of difficult to sew through though, and I recommend you use a ball point needle and stitch really slowly over the elastic. I marked the elastic placement
using the template, I just positioned one corner of my tablet keeper on the template at a time, and moved it as necessary to mark all 4 corners.
*Tablet Keeper Shapers. These are the rigid plastic inserts for giving the tablet keeper good sturdy structure. I cut one of the large shapers into two small ones for the front and back of my tablet keeper, using my rotary cutter and ruler. It is not the easiest thing to cut, so be careful and go slow. I would suggest you measure your own tablet keeper for your tablet keeper shaper cutting measurements. My left one was cut to about 5" x 7 1/4" and the right one was a little wider, 5 1/8" x 7 1/4".
*Binding. I opted to sew the binding on the right side (outer side) of the tablet keeper and then hand stitch it down on the inside.
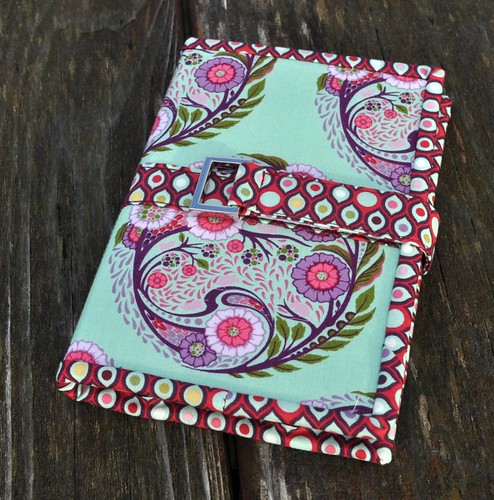
So here's my finished tablet keeper:
It actually turned out better than I thought it would! And it's quite sturdy too. I was worried about all the layers of fabric and interfacing before I sewed it up, thinking it would be too much for such a small cover, but it is just right.
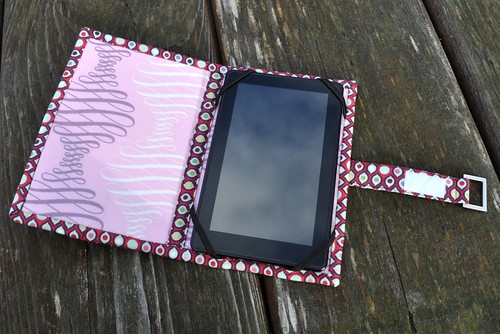
Here it is opened up:
I really like it! If I made it again I think I would only change a few things: I would make it the full 8 1/4" tall I mentioned above. I would be more careful to make it more symmetrical, and I would make the strap a little bit longer too (it is folded over double from the ring to where it connects to the back of the cover and mine wasn't quite long enough to be doubled over that whole length.)
Thanks again to Nancy Zieman for asking me to participate in the tablet keeper blog tour. If you're interested in making your own tablet keeper, be sure to visit the other participating blogs and see how they customized theirs!
Also, don't forget to stop by Nancy's blog to enter to win one of three prize kits she's giving away! (They are really cool prizes, go look!)
January 3 Nancy Zieman http://www.nancyzieman.com/blog
January 4 Amy Ellis http://amyscreativeside.com/
January 5 Sharon Pernes http://craizeecorner.blogspot.com/
January 6 Vicki Christensen http://www.sewinspiredblog.com/
January 9 Joan Hawley http://www.lazygirldesigns.com/blog
January 10 Pat Sloan http://patsloan.typepad.com/
January 11 Eileen Roche http://dzgns.com/blog/
January 12 Liz Hicks http://blogerisms.blogspot.com
January 13 Fran Ortmeyer http://cloverusa.wordpress.com/
January 16 Ilene Miller http://happyvalleyprimitives.blogspot.com/
January 17 Julie Herman http://www.jaybirdquilts.com/
January 18 Jenny Gabriel http://www.sewvacoutletblog.com/
January 19 Natalia Bonner http://www.piecenquilt.blogspot.com/
January 20 Frieda Anderson http://friestyle.blogspot.com/
January 23 Cindy Cloward http://www.rileyblakedesigns.com/blog/
January 24 Beckie Hansen http://www.nancyzieman.com/blog
January 25 Amy Webb http://www.amylouwhosews.com/
January 26 Allie Robertson http://thinkcrafts.com/
January 27 Mary Mulari http://www.nancyzieman.com/blog
January 30 Laura Wasilowski http://artfabrik.blogspot.com/
January 31 Carol Porter http://www.nancyzieman.com/blog
Disclosure: Clover provided the Tablet Keeper template set, strap interfacings, hardware, and tablet keeper shapers for this project.
Also! If you're new here, and interested in Free Motion Quilting, check out Focus on Free Motion Quilting


How cute! I was trying to figure out what that packaged stuff was for! What a cleaver idea!
ReplyDeleteHi, found this post on Pinterest. I love the buckle closure, super cute! My hubby is getting a Kindle for his birthday so I may just have to make him one...in manly colors of course :) Love your blog!
ReplyDeleteThis is so, so cute! I have seen these made befor, but never with a buckle. Very good job.
ReplyDeleteThank you for the very detailed information! I have a Kindle Fire too, so this will help me a lot! Nice fabric choices!
ReplyDeleteVery pretty! I cannot wait to try the strap interfacing! It looks so easy to use!
ReplyDeleteThis is great! I love the fabric you used.
ReplyDeleteI love this! I have not seen patterns for anything but drop in covers and my husbands wants this kind. I may have to get one of those templates.
ReplyDeleteThanks for sharing your ideas!
Yours is very classy!
Good job on the fabric choices, they're really nice. Thanks for the instructions for Kindle Fire.
ReplyDeleteHow cute, I love your fabric combination! wanting to make one of these for my new tablet!
ReplyDeleteI love your fabric choice. Thank you for all the input. I can't wait to make one.
ReplyDeleteLove your fabrics. Thank you for the feedback on making a cover for the Fire. Tamsyn
ReplyDeleteThanks for being part of the Blog Tour! As everyone else has noted, great fabric choices and wonderful modification.
ReplyDeleteI love the fabrics you chose. Thanks for the inspiration!
ReplyDeleteThis is lovely Vicki! I ordered the template the other day, but really appreciate your observations on how to modify it for other uses!
ReplyDeleteThanks for describing your process for altering the measurements, and what you would do differently. Pretty!
ReplyDeleteCute. I love the fabrics you are using!
ReplyDeleteI love the covers idea. I had never thought of making a cover for my Android tablet. But now I am inspired. Have to go shoping for some material.
ReplyDeleteLove your choice of fabric, and love the buckle! Great idea!
ReplyDeleteI'm so glad you shared the details for making this fit a Kindle Fire. I'll be using your notes in the future. I also want to play around with the strap and see if I can get it fold, so that I can use the case standing up.
ReplyDeleteMy daughter got me a Kindle for Christmas last year. I really have enjoyed it. My husband just got me an Ipad2 for this Christmas. I have a smart cover for it. However, something over that to carry it with would be nice. Thanks for the giveaway.
ReplyDeleteSallyKingemail@gmail.com
www.BabyStepsQuilting.com
Great ideas and thanks for the information to make a cover for the Kindle Fire! Very nice!
ReplyDeleteSuch a versatile pattern!
ReplyDeleteI liked your elastic idea, I will try that.
ReplyDeleteThanks for the great info! Love the cover!
ReplyDeleteI love the pretty cover you made. Thanks for all the great tips!
ReplyDeleteVickie in Cleveland
Thanks for all the measurements as I want to make one for grand's new Christmas present. I have to make with zebra fabric!
ReplyDeletethat is beautiful, love your fabrics!
ReplyDeleteI love your tablet cover. You did a great job! Your quilting is beautiful. I am going to follow your blog so I can learn all of your tricks!
ReplyDeleteThat turned out so cute! I will definitely be back - I'm planning on getting a Fire with my tax $ this year and don't want to spend $40 for one! The only thing I'd like to add is a easel thingy so it's propped up...
ReplyDeleteThanks! Tina 'the book lady'
Do you have any tricks for hand sewing your binding? I tried hand sewing the binding for my first tablet keeper but the shapers themselves are so stiff that I was having a hard time manipulating it enough to get my stitches even.
ReplyDelete